AI
Claude Code Features: 12 Power Features That Change How You Build
TL;DR Commit CLAUDE.md to your repository. This means every team member who opens Claude Code in the project gets the same baseline context — your conventions, your architecture, your preferences. It's free, asynchronous onboarding for both humans and AI. Review it in PRs. Update it when your conventions change. Treat it with the same care as your README.
Read this article as text (accessible version)
claude — bash — 80×24
~/my-project $ claude
✻ Welcome to Claude Code! (v1.2.14)
✻ Reading CLAUDE.md... project context loaded.
✻ 3 skills available · MCP: github, figma
claude> /init
✻ Created CLAUDE.md with project structure
claude>
Claude Code Features:
Claude Code Features:
12 Power Features That
Change How You Build
You've typed "refactor this module" into Claude Code and watched it confidently edit 23 files in the wrong direction. That's not a Claude problem — it's a workflow problem. Here are the 12 features that turn Claude Code from a capable assistant into a reliable engineering partner.
Read the Deep Dive ↓ Open the Lab ⌨️ CLAUDE.md Permissions Plan Mode Checkpoints Skills Hooks MCP Plugins Context Commands Sub-Agents Table of Contents- CLAUDE.md — Persistent Memory
- Permissions — Speed vs Safety
- Plan Mode — Think Before Acting
- Checkpoints — Your Time Machine
- Skills — Reusable Automation
- Hooks — Deterministic Side Effects
- MCP — Infinite Tool Access
- Plugins — One-Command Setup Sharing
- Context Window Management
- Slash Commands
- Sub-Agents — Parallel Expertise
01CLAUDE.md — Giving Claude a Memory That Lasts
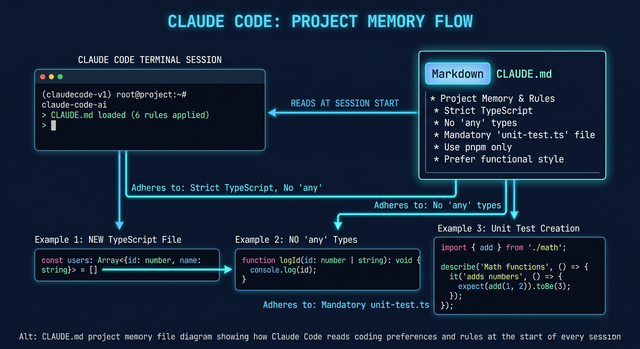
Every single Claude Code session starts fresh. No memory of the last session. No knowledge that you use TypeScript strict mode, that your tests live in src/__tests__/, or that you never want to use class components. Claude doesn't know any of that unless you tell it every time — which is exactly the kind of repetitive friction that makes AI assistants feel like tools rather than partners.
CLAUDE.md is the solution: a Markdown file that lives at your project root and gets read automatically at the start of every session. Think of it as your project's engineering handbook written specifically for Claude. You define your coding standards, project structure, preferred patterns, things to always do (write tests), and things to never do (use any in TypeScript). Claude reads it, internalizes it, and follows those rules throughout the session without you needing to repeat yourself.
The key insight most developers miss: CLAUDE.md doesn't need to be exhaustive. Short, declarative, opinionated instructions outperform verbose documentation every time. "Use React Query for data fetching, never useState + useEffect for async" is worth more than three paragraphs explaining your data fetching philosophy. Run /init in a fresh Claude session and it will scan your codebase and auto-generate a reasonable CLAUDE.md to start from. Edit it from there. Keep it under 300 words if you can.
Commit CLAUDE.md to your repository. This means every team member who opens Claude Code in the project gets the same baseline context — your conventions, your architecture, your preferences. It's free, asynchronous onboarding for both humans and AI. Review it in PRs. Update it when your conventions change. Treat it with the same care as your README.
CLAUDE.md — example# Project: PaymentService API ## Stack - Node 20 + TypeScript strict mode + Express - PostgreSQL via Prisma ORM - Jest for all tests (unit + integration) - Zod for all input validation ## Rules - ALWAYS write unit tests alongside implementation - NEVER use `any` — use `unknown` + type guards - NEVER commit secrets or .env values - Follow existing file patterns in src/services/ ## Structure src/ routes/ ← HTTP handlers only, no business logic services/ ← all business logic models/ ← Prisma model extensions __tests__/ ← mirror src/ structure
02Permissions — Calibrating the Trust Dial
Coding agents are powerful because they can take actions — editing files, running commands, making changes at scale. They're also risky for exactly the same reason. A rogue rm -rf in the wrong directory, an accidental commit of credentials, an irreversible database migration run without your review — these are real risks that a misconfigured agent can cause in seconds.
Claude Code asks for your approval before every potentially dangerous action by default. That's safe, but it grinds your workflow to a halt when you're in a flow state and every harmless test run requires your explicit thumbs-up. Permissions let you customize this at a granular level. You can preapprove specific safe actions — running your test suite, reading files, committing staged changes — and keep the approval gate on genuinely dangerous ones like deleting files or modifying production configs. Type /permissions in a session to open the interactive permissions menu.
Here's the thing most people get wrong with permissions: they either lock everything down (safe but slow) or open everything up (fast but terrifying). The right approach is to start conservative, work with Claude for a session, identify which approvals are just friction vs which ones are genuine guardrails, then selectively open up the safe ones. Build a permission profile that matches your workflow. The goal is to minimize interruptions on the actions you'd approve 100% of the time, while preserving oversight on anything that could be irreversible.
⚠️ Never Pre-Approve File Deletion or Network Calls in ProductionPre-approving "run bash commands" sounds convenient but is extremely broad. Scope your allowlist carefully. "Run npm test" is safe. "Run bash commands" is not — it includes deleting files, curl-ing external services, or modifying system configs. Use tool-specific allowlisting rather than category-level permissions. And never connect Claude Code to a production environment without reviewing every action — agents make mistakes, and a production database doesn't have an undo button.
permissions — common configurations# Safe to pre-approve (low risk, high frequency) Allowed: - read_file # Claude reads source files - run_bash: "npm test" # run tests only - run_bash: "git status" # read-only git commands - run_bash: "git diff" # Always require approval (irreversible or high-risk) Ask: - write_file # review before writing - run_bash: "git commit" # review before committing # Never allow in agent sessions Blocked: - run_bash: "rm" # no file deletion - run_bash: "curl" # no external network calls - run_bash: "sudo" # no elevated privileges
03Plan Mode — Think Before You Touch a Single File
Here's the failure mode that every Claude Code user has hit: you give it a complex refactoring task, it immediately starts editing files with confidence, and ten files later you realize it completely misunderstood the requirement. Now you're manually undoing changes, checking git diff, hoping checkpoints saved your state. The root cause is that "start coding immediately" is the wrong default for complex tasks.
Plan Mode enforces a separation between thinking and doing. Press Shift+Tab to toggle into Plan Mode. In this mode, Claude can read your files, ask clarifying questions, and propose a detailed step-by-step plan — but it cannot write a single file or run any command. Every tool available is read-only. Once you've reviewed the plan, corrected any misunderstandings, and given approval, you toggle back to normal mode and Claude executes it with the full context of the agreed approach.
Imagine hiring a contractor to renovate your kitchen. You wouldn't want them to start knocking down walls the moment they walk in. You'd want them to walk through the space, ask questions, draw up a plan, get your sign-off, and then start swinging hammers. Plan Mode makes Claude that thoughtful contractor instead of an enthusiastic demolition crew. The investment in planning almost always pays off in fewer wasted tokens, fewer wrong-direction edits, and cleaner implementation.
💡 Use Plan Mode for Any Task Touching 3+ FilesThe heuristic that works well: if the task involves changes to more than two or three files, or if you're not 100% sure how Claude will approach it, start in Plan Mode. Let Claude read the relevant code, propose the approach, and explain its reasoning. You'll often discover that your initial prompt was ambiguous in ways you didn't realize, or that Claude's approach would have gone in a direction you didn't want. Catching that in the planning phase costs seconds. Catching it after 20 file edits costs 20 minutes.
04Checkpoints — Undo at Any Point in History
You asked Claude to refactor a critical module. It edited 15 files. You realize the approach it took is fundamentally incompatible with your database schema. You need to undo everything — but there's no single "undo all changes" button. You're now manually comparing git diffs, reverting files one by one, hoping you don't miss anything. This is the situation Checkpoints eliminate.
Before every file edit, Claude Code automatically snapshots your project state. These snapshots accumulate throughout your session as timestamped, described checkpoints. Type /revert in your session to see the full checkpoint timeline — each entry shows what changed, when, and why. Select the checkpoint you want to restore, choose whether to revert just specific files or the entire state, and you're back to that exact moment. The operation is instant and complete.
The practical implication of checkpoints is that they change your relationship with risk. Without them, complex agent tasks feel dangerous — what if it goes wrong? With checkpoints, bold experiments are safe by default. You can ask Claude to try a completely different architectural approach, see how far it gets, realize it's not working, and restore to your starting state in seconds. You can run risky refactors on a checkpoint and only merge the results if they look good. Checkpoints transform Claude Code from a tool you approach cautiously to one you can explore aggressively.
✅ Create Named Checkpoints Before Risky OperationsWhile Claude creates checkpoints automatically, you can also create named ones manually before particularly risky operations. Before asking Claude to do a large-scale refactor, database migration, or dependency upgrade, create a named checkpoint with a clear description. This gives you a clearly labeled restore point that's easy to find in the timeline rather than searching through automatic checkpoint timestamps.
05Skills — Packaging Your Workflows for Reuse
Every team has recurring workflows that require specific, detailed instructions. "When adding a new API endpoint: create the route handler, add Zod validation, write unit tests covering happy path and error cases, update the OpenAPI spec, and add an entry to CHANGELOG.md." That's a complex, multi-step workflow that you might execute dozens of times. Typing it out every time — or worse, having every team member re-discover the correct instructions — is exactly the kind of friction that slows teams down.
Skills are predefined instruction sets packaged as skill.md files. Each skill has a name, a description that tells Claude when to invoke it, and the actual step-by-step instructions. At session start, you provide Claude with the list of available skills. When you describe a task that matches a skill's purpose, Claude automatically invokes the right skill's instructions rather than guessing. You build a skill once; your entire team benefits every time the workflow runs.
Think of skills as the AI equivalent of a documented runbook. Junior engineers who are new to the project can ask Claude to "add a new database migration" and get the same quality output as a senior engineer who's done it fifty times — because the skill captures the senior engineer's knowledge in reusable form. Build your first skills around the workflows where you most frequently catch Claude doing things differently than you'd like.
💡 Start with Your 3 Most Repeated WorkflowsAudit your Claude Code sessions for the past week and identify the three workflows where you most often have to add detailed follow-up instructions. Those are your first three skills. Common candidates: "add API endpoint," "write integration test," "create new React component with tests," "add database migration," "set up feature flag." Each one saves you 2–5 minutes of prompt crafting per use and eliminates the variance in output quality.
skills/add-api-endpoint.md---
name: add-api-endpoint
description: Use when adding a new REST API endpoint
---
# Add API Endpoint Skill
When adding a new endpoint, ALWAYS:
1. Create route handler in src/routes/{resource}.ts
2. Create service function in src/services/{resource}.ts
3. Add Zod schema for request validation
4. Write unit test covering: success, 400 validation error, 500 server error
5. Update src/routes/index.ts to register the new route
6. Add endpoint to OpenAPI spec in docs/openapi.yaml
7. Add entry to CHANGELOG.md under [Unreleased]
NEVER: Add business logic in route handlers, skip tests
06Hooks — Automating the Things That Must Always Happen
Coding has a category of actions that should be automatic, non-optional, and completely deterministic. Format the code. Run the linter. Log every file change for audit purposes. Run the security scanner after any dependency update. These aren't things you want to remind Claude about in your prompt — they're invariants of your development process that should happen regardless of what Claude was asked to do.
Hooks are scripts that attach to specific points in Claude Code's workflow loop — before a tool runs, after a tool runs, at the start of a session, at the end. They execute automatically without Claude needing to decide to invoke them. A post-write hook that runs prettier --write {file} ensures that every file Claude touches is formatted, every time, without ever asking Claude to format it. A pre-commit hook that runs your security scanner ensures no secrets slip through.
The conceptual model: Claude handles the intelligent, context-dependent decisions. Hooks handle the deterministic, rule-based side effects. This separation keeps your prompts focused on what you want Claude to accomplish and removes the cognitive overhead of reminding Claude about process requirements on every task.
⚠️ Hooks Run Outside Claude's Control — Test CarefullyBecause hooks execute as shell scripts at specific lifecycle points, a broken hook can disrupt your entire Claude Code workflow. A hook that errors out at the wrong point can prevent Claude from completing operations. Test hooks thoroughly in a separate project before adding them to your main development environment. Use verbose logging in hooks during development so you can diagnose issues quickly. And keep hooks fast — a hook that takes 10 seconds to run will fire dozens of times per session, adding up to significant idle time.
07MCP — Connecting Claude to Your Entire Tool Stack
Claude Code can read files and run bash commands out of the box. That covers a lot of ground — but not everything. Your Figma designs live in the cloud. Your team's discussions happen in Slack. Your issue tracker is GitHub or Linear. Your observability data is in Datadog. Without access to these systems, Claude is operating with an incomplete picture of your actual engineering environment.
The Model Context Protocol (MCP) is an open standard that allows anyone to build and expose tools to AI agents. An MCP server is a service that wraps an external tool or data source and exposes it through the MCP protocol. Add an MCP server to Claude Code and it immediately gains access to all the tools that server exposes. The GitHub MCP server gives Claude the ability to read issues, create pull requests, and review code changes. The Figma MCP server lets Claude inspect your design files. The Linear MCP server lets Claude create and update tickets directly from your coding session.
The ecosystem of publicly available MCP servers is expanding rapidly. You can add the tools your team already uses without writing any code — just point Claude Code at the server URL and authenticate. For internal tools or proprietary systems, you can build your own MCP servers using the open specification. This extensibility is what transforms Claude Code from an isolated coding assistant into an integrated member of your engineering toolchain.
💡 Start with GitHub MCP — Immediate ROIIf you're going to add one MCP server first, make it GitHub. The GitHub MCP integration lets Claude read issues, understand pull request context, create branches, and push code — all within the same session where it's writing the code. This closes the loop between "understand the ticket," "write the code," and "open the PR" into a single coherent workflow instead of three separate tool switches.
.claude/mcp.json — adding MCP servers{
"mcpServers": {
"github": {
"command": "npx",
"args": ["-y", "@modelcontextprotocol/server-github"],
"env": {
"GITHUB_PERSONAL_ACCESS_TOKEN": "${GITHUB_TOKEN}"
}
},
"slack": {
"command": "npx",
"args": ["-y", "@modelcontextprotocol/server-slack"],
"env": {
"SLACK_BOT_TOKEN": "${SLACK_TOKEN}",
"SLACK_TEAM_ID": "T01234567"
}
}
}
}
08Plugins — Share Your Perfect Setup in One Command
You've spent two hours configuring the perfect Claude Code setup for your team's TypeScript monorepo. CLAUDE.md with your conventions. Four skills covering your most common workflows. Hooks for formatting and linting. Three MCP servers. A carefully tuned permissions profile. It works beautifully. Then a new engineer joins the team and asks how to get set up.
Plugins bundle your entire configuration — skills, hooks, sub-agent definitions, MCP server configs, and metadata — into a single installable unit. Publish the plugin to a Git repository (or a marketplace), and your teammate installs it with one command. They immediately get your entire curated setup without navigating config files, reading documentation, or making mistakes in manual configuration. The plugin is versioned, shareable, and updatable when your team's conventions evolve.
Plugins are also a distribution mechanism for the broader community. If you build a plugin for a popular framework — "React Testing Library best practices," "FastAPI microservice patterns," "AWS CDK deployment workflows" — you can publish it and everyone using that stack benefits. The same way npm packages share code, Claude Code plugins share agentic workflows and configurations.
✅ Create a Team Onboarding PluginThe highest-value use of plugins for most teams is an onboarding plugin: a bundle that every developer installs when they join the project. It sets up their Claude Code environment identically to everyone else's — same skills, same permissions profile, same MCP servers, same hooks. This eliminates the "how does your setup differ from mine?" debugging conversation and ensures consistent agent behavior across the entire team.
09Context Window Management — Don't Let Your Session Run Out of Space
Claude Code operates within a 200,000-token context window. That sounds enormous until you're deep in a complex session — your CLAUDE.md, three skill files, eight MCP tool descriptions, and a long conversation history — and you're creeping toward the limit. When the context window fills, Claude has to start forgetting earlier parts of the conversation, potentially losing critical decisions or context that the current task depends on.
Run /context at any point in your session to see a breakdown of what's consuming your context budget: CLAUDE.md, skills, MCP tool descriptions, and conversation history. This audit often reveals surprises — a skill file that's three times longer than necessary, or an MCP tool description that's verbosely documented. When you're approaching capacity, run /compact to ask Claude to intelligently compress the conversation history, preserving key decisions and technical conclusions while freeing up tokens for continued work.
Don't wait until Claude starts losing context to run /compact. By that point, critical context may already be at the edge of the window. Run /context periodically during long sessions to check utilization. When you hit 60–70% capacity on a task that's not finished, compact proactively with specific instructions about what to preserve ("preserve all decisions about the database schema and the API contract"). Reactive compaction often loses exactly the context you needed.
10Slash Commands — Keyboard Shortcuts for Your Agent
As you use Claude Code more, certain operations become routine. You need to check how much this session has cost. You want to see the current context utilization. You need to clear the conversation and start fresh. You want to review available permissions. Reaching for these operations through conversational prompts adds unnecessary friction to your workflow.
Slash commands are single-word shortcuts that trigger common operations instantly. /init creates CLAUDE.md, /permissions opens the permissions manager, /context shows context utilization, /compact compresses conversation history, /revert shows the checkpoint timeline, /agents manages sub-agents. You invoke them by typing a forward slash followed by the command name — the same interaction model as Slack commands, Discord bots, or Vim commands.
The full command list is queryable via /help. As Claude Code evolves, new commands are added for new capabilities. Developing fluency with slash commands is one of the simplest ways to dramatically improve your Claude Code workflow velocity — you spend less time navigating menus and more time building.
In order of frequency for most developers: /context (check utilization), /compact (free up space), /revert (checkpoint management), /permissions (adjust allowlist), /agents (manage sub-agents), and /help (discover new commands). Memorize these six and you'll have fluid control over the most important operational aspects of your Claude Code sessions.
11Sub-Agents — Parallel Expertise Without Polluting Your Context
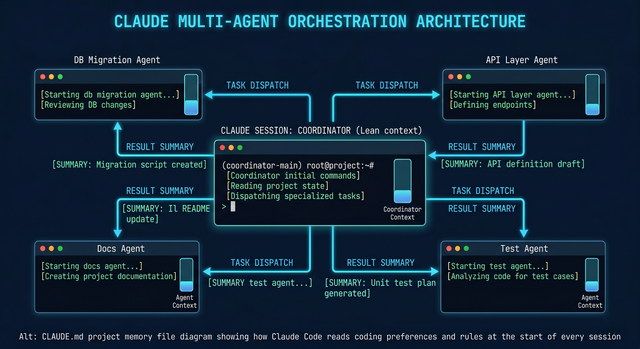
Complex tasks often span multiple domains. Building a new feature might require: migrating the database schema, updating the API layer, rewriting the frontend components, adding end-to-end tests, and updating the documentation. Doing all of this in a single Claude Code session creates a sprawling conversation that quickly consumes your context window and makes it hard to track which part of the task is currently in focus.
Sub-agents are separate Claude Code sessions dedicated to specific subtasks. Your main session acts as the coordinator: it breaks the complex task into focused pieces and hands each piece off to a sub-agent. Each sub-agent works independently with its own clean context window, then returns a concise summary of what it did and what decisions it made. Your main session stays clean and context-efficient throughout.
Create a sub-agent via /agents → "Create Agent" → give it a name and a focused prompt. The most effective sub-agents are domain-specific: a "security review" agent that knows to look for common vulnerabilities, a "test coverage" agent that focuses exclusively on identifying untested code paths, a "database migration" agent that handles schema changes with careful rollback awareness. Type /agents to create, manage, and review sub-agent results without leaving your main session.
Here's the counterintuitive thing most Claude Code guides don't cover: sub-agents can work in parallel on independent parts of a task, achieving the same result in a fraction of the time. If you have four completely independent modules to refactor, spinning up four sub-agents simultaneously — each working on one module — can reduce total time by 75% compared to sequential execution in a single session. The main session coordinates and collects results; the sub-agents do the actual work in parallel.
synthesisHow All 11 Features Fit Together
These features aren't isolated capabilities — they compose into a complete engineering workflow. Your CLAUDE.md ensures every session starts with your conventions. Permissions calibrate the trust dial so fast paths stay fast and dangerous paths stay gated. Plan Mode prevents costly wrong-direction starts on complex tasks. Checkpoints make experimentation safe. Skills encode your best practices as reusable automation. Hooks make formatting, linting, and security checks invariant. MCP connects Claude to your entire tool stack. Plugins make your team's setup instantly reproducible. Context management keeps long sessions healthy. Slash commands give you instant control of all of it. And Sub-agents distribute complex work across parallel sessions without blowing up your context.
The payoff of mastering all these features isn't just productivity — it's qualitatively different software development. You stop managing the AI and start delegating to it. The repetitive, mechanical parts of engineering become automated invariants. You focus on architecture, decisions, and the problems that genuinely require human judgment.
getting startedYour First Week with Claude Code
day-by-day onboardingDay 1: Foundation $ npm install -g @anthropic-ai/claude-code $ claude # start first session claude> /init # auto-generate CLAUDE.md # Review and edit CLAUDE.md to match your conventions # Try a small task — ask Claude to add a function with tests Day 2: Safety + Control claude> /permissions # review default permissions # Pre-approve: read_file, run npm test # Keep ask: write_file, git commit # Try Plan Mode (Shift+Tab) on a medium-complexity task Day 3: Checkpoints + Skills # Give Claude a task that edits 5+ files claude> /revert # see checkpoint timeline # Identify one repeated workflow, write first skill.md Day 4: MCP Integration # Add GitHub MCP server to .claude/mcp.json # Ask Claude to read an open issue and implement it # Notice Claude referencing issue context in code comments Day 5: Sub-Agents claude> /agents # create first sub-agent # Create "security-review" agent # Run it against your feature branch # Review its summary in your main session
FAQFrequently Asked Questions
What is CLAUDE.md and where should it be placed? + CLAUDE.md is a Markdown file placed at the root of your project directory that Claude Code reads automatically at the start of every session. It serves as persistent memory — defining your coding conventions, project structure, preferred patterns, and rules Claude should follow. There's no required format; keep it concise and declarative (under 300 words ideally). Run /init in a Claude Code session to auto-generate a starting version. Commit it to version control so all team members get the same baseline context. You can also place CLAUDE.md files in subdirectories for folder-specific conventions that override the root file. How does Plan Mode prevent wasted tokens? + Plan Mode restricts Claude to read-only tools — it can read files, search codebases, and ask clarifying questions, but cannot write files or run commands. This forces explicit planning before execution. Complex tasks where Claude misunderstands the scope or approach can burn hundreds of thousands of tokens on incorrect edits before you notice the direction is wrong. In Plan Mode, you see Claude's full proposed approach before any tokens are spent on execution. You can correct misunderstandings, clarify scope, or reject the plan entirely — all at the cost of only the planning tokens, not the execution tokens. For complex tasks, Plan Mode typically reduces total token consumption by 30–60%. What is MCP (Model Context Protocol) in Claude Code? + MCP (Model Context Protocol) is an open standard that defines how AI agents connect to external tools and data sources. An MCP server wraps an external service — GitHub, Slack, Figma, Linear, a database, an internal API — and exposes its capabilities through a standardized protocol. Add an MCP server to Claude Code's configuration and Claude immediately gains access to all the tools that server exposes. Thousands of publicly available MCP servers exist for common tools. For internal or proprietary systems, you can build custom MCP servers using the open specification. MCP is what transforms Claude Code from a file editor into an integrated member of your engineering toolchain. How do checkpoints differ from git version control? + Git version control requires deliberate commits — you have to remember to commit before a risky operation, and reverting means managing branches, stashes, or reset operations. Checkpoints in Claude Code are automatic and granular: Claude snapshots your project state before every file edit, without any action required from you. The checkpoint timeline shows exactly what changed between each snapshot with Claude's description of what it was doing. Restoring to a checkpoint is instant and doesn't require git knowledge. Checkpoints are session-scoped safety nets — not a replacement for git, but a complementary safety layer that operates at the granularity of individual edits rather than deliberate commits. What are Claude Code skills and how do they differ from prompts? + A prompt is an instruction you type to Claude in a specific session. A skill is a persistent, named instruction set stored as a skill.md file that Claude can invoke automatically when it detects the right context. The practical difference: prompts require you to remember and retype instructions every time; skills encode those instructions once and invoke them on-demand. Skills are also shareable — via plugins or direct file sharing — so the entire team benefits from well-crafted workflow instructions without each person needing to develop their own prompt engineering for common tasks. Skills are best for multi-step, opinionated workflows that should always follow the same pattern. When should I use sub-agents vs a single Claude Code session? + Use sub-agents when: (1) a task spans multiple independent domains that don't need to share context — database changes, API changes, and frontend changes can often proceed independently; (2) you need parallel execution to reduce total time; (3) a subtask requires heavy exploration (reading many files, testing approaches) that would pollute your main session's context; or (4) you want domain-specialized behavior, like a security review agent prompted to look for specific vulnerability patterns. Stay in a single session for tasks that are deeply interdependent, where decisions in step 2 affect the approach in step 3, or where the total scope is small enough that context usage won't become a problem. How should I manage the 200,000 token context window? + Three strategies: (1) Keep inputs lean — concise CLAUDE.md (under 300 words), focused skill files, and minimal MCP tool descriptions where possible. Run /context to audit what's consuming space. (2) Compact proactively — run /compact with instructions about what to preserve when you hit 60–70% utilization, not when you're already at the edge. (3) Use sub-agents strategically — move heavy exploration tasks to sub-agents with fresh context windows instead of doing them in your main session. Long sessions doing exploratory work (reading many files, trying multiple approaches) consume context faster than focused implementation sessions. Design your workflow to minimize the size of the context you need to maintain at any given point. What's the difference between Hooks and Skills in Claude Code? + Skills are instructions that Claude reads and follows as part of its reasoning — they guide Claude's decisions about what to do and how to do it. Hooks are shell scripts that execute automatically at specific workflow lifecycle points (before/after a tool runs, at session start/end) regardless of Claude's reasoning. Skills: intelligent, context-aware, guide Claude's behavior. Hooks: deterministic, unconditional, execute external scripts. Use skills for "how to approach this type of task" instructions. Use hooks for "this must always happen, no exceptions" side effects like formatting, linting, security scanning, or logging. They complement each other: hooks ensure invariants, skills ensure quality.⌨️ Claude Code Lab
Four interactive experiments: CLAUDE.md builder, permissions configurator, checkpoint simulator, and context window calculator.
CLAUDE.md Configuration Project Name Primary Language Framework Test Framework Always Rules (select all that apply) Always write unit tests Never use implicit any / dynamic types Never commit secrets or .env values Update CHANGELOG.md on changes Generated CLAUDE.md 0 Word count 0 Est. tokensAim for <300 words. Shorter = more context left for your code. This generated file is a starting point — customize it to your project.
Permission ConfigurationClick each permission to cycle: ASK → ALLOW → BLOCK
0 Pre-allowed 0 Blocked 0 Ask each time Medium Risk level Permission Audit Log Generated configCheckpoint timeline — click a checkpoint to simulate /revert
Checkpoint SimulatorSimulate a coding session. Each action creates a checkpoint. Click "Revert" to restore any earlier state.
Session Log 0 Checkpoints Start Current stateContext window usage breakdown (200K token limit)
Context Usage Simulator CLAUDE.md size (words) 150 Skills loaded 3 MCP tool descriptions 2 servers Conversation turns 40 Files read this session 12 — Total tokens used — % of 200K limit — Tokens remaining OK StatusKeep reading
Related articles
 AI
AIEnterprise RAG: How to Build Accurate, Private AI Systems | Zetsapp
Teams frequently ask "should we fine-tune or use RAG?" as if it's binary. In production, the strongest systems use both: RAG for dynamic factual grounding, and light fine-tuning (or just careful prompting) for output style, tone, and domain-specific reasoning patterns. Don't fine-tune to teach the model facts — that's what retrieval is for.
 AI
AIAI Agents for Business: Use Cases, Implementation Guide & ROI in 2026 | Zetsapp
The most common mistake in discovery calls is a stakeholder describing a chatbot project using agent language ("it should be smart and handle anything"). Before scoping anything, get explicit about which systems the agent needs write access to. If the answer is "none, it just answers questions," you likely need a well-grounded RAG chatbot, not an agent — simpler, cheaper, faster.
 AI
AIThe Shift to Cloud 3.0: Architecting Low-Latency Apps With Distilled On-Device AI | Zetsapp
The Shift to Cloud 3.0: Architecting Low-Latency Apps With On-Device AI :root { --sp: 0.28s; } [data-theme="dark"]…