
The year was 1995. Tatu Ylönen, a Finnish researcher, had just watched a password-sniffing attack compromise machines on his university network. The attacker sat quietly on the network, intercepting plaintext telnet and rlogin sessions — reading usernames, passwords, and commands in the clear as if they were postcards. Within three months, Ylönen had written and released the first version of SSH. Within a year, it had 2 million users.
Today, SSH is so fundamental to computing infrastructure that most engineers treat it like the ls command — they know it works, they use it every day, and they've never once thought about what happens in the half-second between pressing Enter and getting a shell prompt. That half-second is one of the most elegant pieces of applied cryptography in existence: a multi-stage protocol that negotiates algorithms, performs a secure key exchange, authenticates both parties, and establishes an encrypted channel — all without ever sending your private key, your password in plaintext, or any secret that could compromise past sessions if captured later.
This post is the explanation you never got in a tutorial. We're going to walk through every stage of an SSH connection — from the TCP handshake to the encrypted session — with real commands, real cryptographic concepts explained without the math, and the security hardening steps that most guides mention in passing and most teams actually skip. By the end, SSH will feel like a tool you understand instead of magic you depend on.
Table of Contents
- What SSH Is (And What It Replaced)
- Stage 1 — TCP Connection and Version Negotiation
- Stage 2 — Algorithm Negotiation
- Stage 3 — Key Exchange and Perfect Forward Secrecy
- Stage 4 — Authentication: Public Key vs Password
- Stage 5 — The Encrypted Session
- SSH Port Forwarding: Tunneling Other Services
- How It All Connects: The Full SSH Handshake in Sequence
- Getting Started: SSH Setup, Hardening, and Daily Use
- FAQ
- Conclusion
What SSH Is (And What It Replaced)
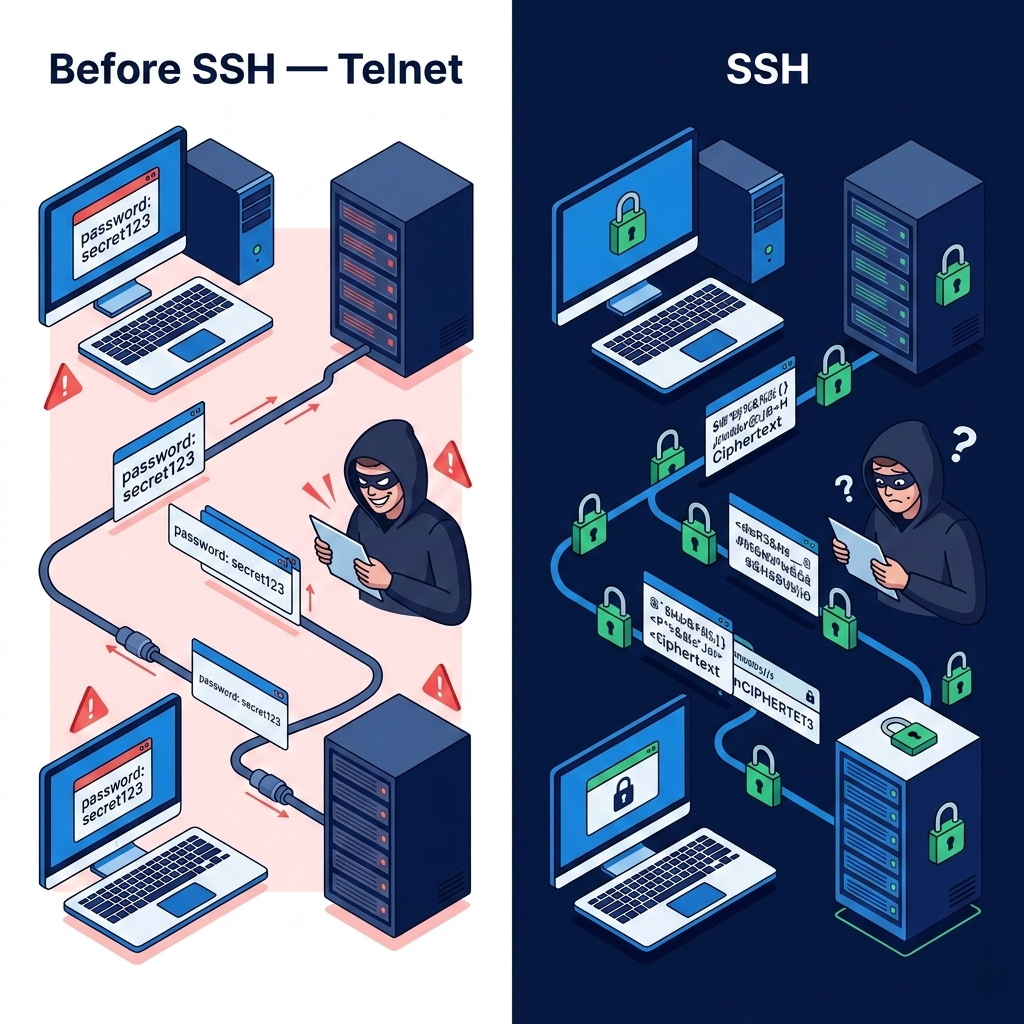
To understand why SSH is designed the way it is, you need to understand the horror show it replaced. Before SSH, remote access meant tools like telnet, rsh (remote shell), and rlogin — protocols that transmitted everything in plaintext. Your username, your password, every command you typed, every line of output that came back — all of it traveled across the network as readable text. Anyone with a network tap or a compromised router between you and your server could watch your session in real time.
This wasn't a theoretical risk. It was a routine attack. Credential harvesting through network sniffing was one of the most common intrusion methods of the early internet era, and it worked because the protocols were designed for trusted, isolated networks that simply didn't exist once the internet became general purpose. SSH replaced these protocols by wrapping every byte of the session in strong encryption — turning that readable stream of characters into ciphertext that looks like random noise to anyone intercepting it.
SSH2 (the version in universal use today, standardized in RFC 4253 and related RFCs) is not just "SSH but more secure." It's a fundamentally different architecture from SSH1, with a proper multi-layer protocol design, support for multiple authentication methods per session, the ability to multiplex multiple channels over a single connection, and the cryptographic improvements that make it resistant to the attacks that had already begun to undermine SSH1 by the early 2000s.
Imagine you're sending a letter through a city where every postal worker reads every envelope. SSH is what happens when you put your letter inside a lockbox, negotiate the combination with the recipient using a method that only produces the combination at both ends simultaneously (never transmitting the combination itself), and then mail the lockbox. The postal workers see a lockbox. They have no idea what
Pro Tips & Common Mistakes — SSH Fundamentals
Pro Tip: SSH1 is not just "older" — it's cryptographically broken. If you ever encounter a server that advertises SSH1 support, that's a security finding worth reporting. Modern OpenSSH disables SSH1 by default, but legacy appliances and embedded devices sometimes still offer it. Check with
ssh -1 user@hostand make sure you get a refusal.
Common Mistake: Treating SSH as "secure by default" regardless of configuration. The protocol is sound, but a misconfigured SSH server — one that allows root login, accepts password authentication from the internet, or uses weak ciphers — is dramatically less secure than the protocol's design intends. The protocol gives you the tools; the configuration determines whether you actually use them.
Stage 1 — TCP Connection and Version Negotiation
Every SSH connection begins with something completely mundane: a TCP connection on port 22. Your SSH client sends a TCP SYN packet to the server, the server responds with SYN-ACK, your client sends ACK, and the connection is established. This three-way handshake is pure TCP — no SSH has happened yet. SSH builds on top of TCP's reliable delivery, not alongside it.
Once the TCP connection is open, the very first thing both parties exchange is their SSH version strings. The server sends something like SSH-2.0-OpenSSH_8.9p1 Ubuntu-3ubuntu0.6 and the client responds with its own version string like SSH-2.0-OpenSSH_9.3. These strings accomplish two things simultaneously: they identify which version of the SSH protocol each party supports, and they identify the software implementation and version (OpenSSH, PuTTY, Dropbear, etc.).
Version negotiation is where SSH2's backward-compatibility-with-SSH1 decision gets made. If both parties support SSH2, the connection proceeds with SSH2. If one party only supports SSH1 and the other is configured to allow it, they negotiate down to SSH1. Modern OpenSSH configurations should never allow this downgrade — the Protocol 2 directive (now the default) ensures you only accept SSH2.
Here's something subtle that most engineers never notice: that version banner from the server is public information visible to anyone who can reach port 22. It tells an attacker exactly which version of OpenSSH you're running — and therefore which CVEs might apply to your server. Obscuring or customizing the banner is a minor but legitimate hardening step.
# See exactly what version banner a server presents (no connection needed)
nc -zv your-server.com 22
# Or with verbose SSH:
ssh -vvv user@your-server.com 2>&1 | head -20
# Look for lines like:
# debug1: Remote protocol version 2.0, remote software version OpenSSH_8.9p1

# Customize your server's banner in /etc/ssh/sshd_config
# to reduce information leakage:
# Banner /etc/ssh/ssh_banner  (custom warning message, not version info)

# Check what ciphers your server advertises:
nmap --script ssh2-enum-algos -p 22 your-server.com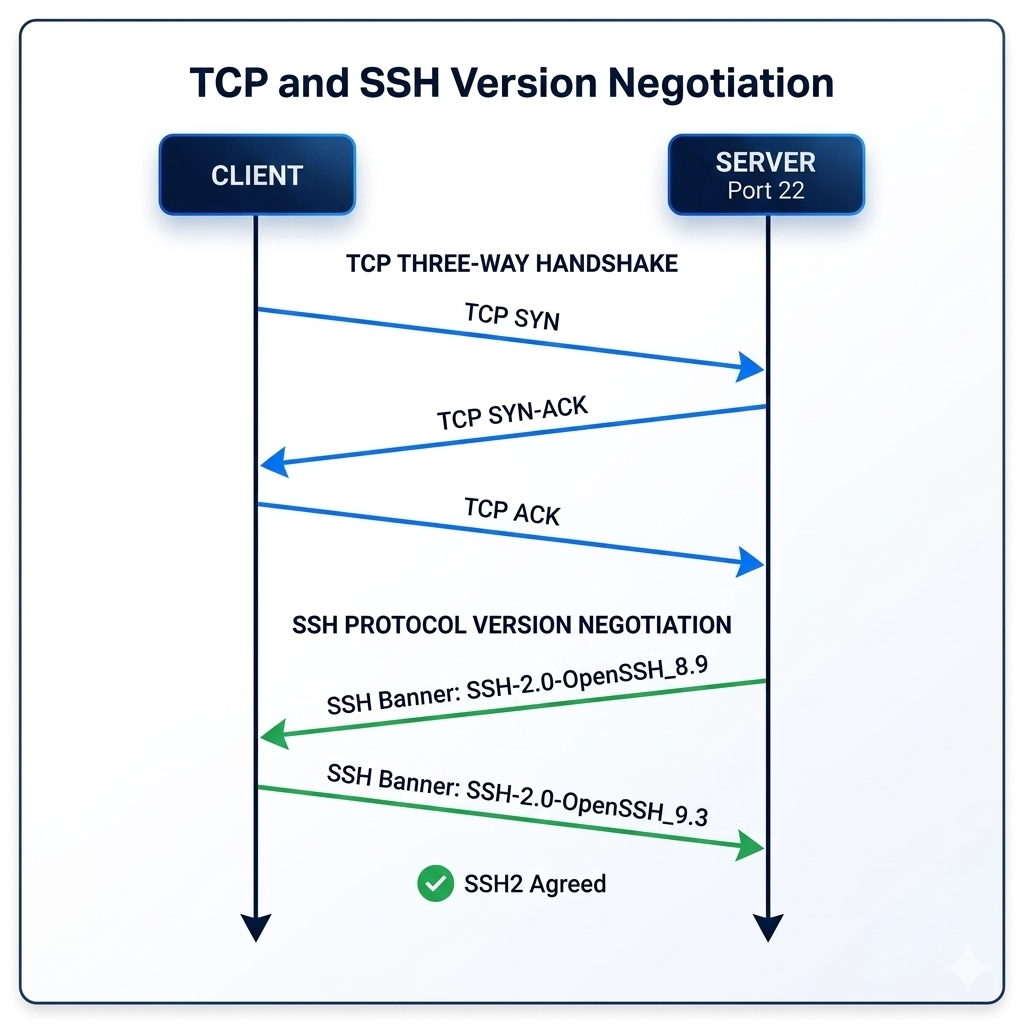
Pro Tips & Common Mistakes — TCP and Version Negotiation
Pro Tip: Change your SSH port from 22 to a non-standard port (e.g., 2222 or a random high port). This doesn't improve security against a determined
attacker — port scanning finds it in minutes — but it reduces noise from automated botnets that exclusively target port 22, cutting your auth log spam by 90%+. Combine it with fail2ban for genuine protection.
Common Mistake: Forgetting to update the SSH server after OS upgrades. The version banner update happens automatically, but configuration files (
/etc/ssh/sshd_config) from old installations often persist with outdated settings. After any major OS upgrade, audit your SSH configuration against current best practices — old defaults that were acceptable in 2018 may be deprecated or insecure today.
Stage 2 — Algorithm Negotiation
Once both parties have agreed on SSH2, the next step is arguably the most technically interesting: negotiating exactly which cryptographic algorithms to use for this session. SSH2 is designed to be algorithm-agnostic — it defines a framework for negotiation, not specific algorithms — which is why it's been able to adopt new cryptography (like Curve25519) without changing the underlying protocol.
The negotiation covers four separate algorithm categories. Key exchange algorithms determine how the shared secret will be established (e.g., curve25519-sha256, ecdh-sha2-nistp256). Host key algorithms determine how the server will prove its identity (e.g., ssh-ed25519, rsa-sha2-256). Encryption ciphers determine how session data will be encrypted (e.g., aes256-gcm@openssh.com, chacha20-poly1305@openssh.com). MAC (Message Authentication Code) algorithms determine how message integrity will be verified. Both client and server send their full ordered lists of supported algorithms for each category, and the negotiation result is the first algorithm from the client's list that also appears in the server's list — client preference wins.
Here's the thing most tutorials miss about algorithm negotiation: the algorithms your server accepts define your attack surface, not just your security level. A server that still advertises diffie-hellman-group1-sha1 (the ancient 1024-bit Diffie-Hellman, broken by the Logjam attack in 2015) or 3des-cbc (triple DES, deprecated) is vulnerable even if modern clients prefer better algorithms — because an attacker performing a downgrade attack can manipulate the negotiation to force weaker algorithms. Audit your server's offered algorithms regularly.
# See what algorithms your server currently offers
ssh -Q cipher          # ciphers your CLIENT supports
ssh -Q kex             # key exchange algorithms your client supports
ssh -Q key             # host key types your client supports

# Audit a remote server's offered algorithms (no authentication required)
nmap --script ssh2-enum-algos -p 22 target-server.com

# Harden your server's algorithm selection in /etc/ssh/sshd_config
# Modern secure configuration (OpenSSH 8.x+):
KexAlgorithms curve25519-sha256,curve25519-sha256@libssh.org,ecdh-sha2-nistp521,ecdh-sha2-nistp384,ecdh-sha2-nistp256
Ciphers chacha20-poly1305@openssh.com,aes256-gcm@openssh.com,aes128-gcm@openssh.com,aes256-ctr,aes192-ctr,aes128-ctr
MACs hmac-sha2-512-etm@openssh.com,hmac-sha2-256-etm@openssh.com,hmac-sha2-512,hmac-sha2-256
HostKeyAlgorithms ssh-ed25519,ssh-ed25519-cert-v01@openssh.com,rsa-sha2-512,rsa-sha2-256

# After changing sshd_config, reload (don't restart — preserve existing sessions):
sudo systemctl reload sshd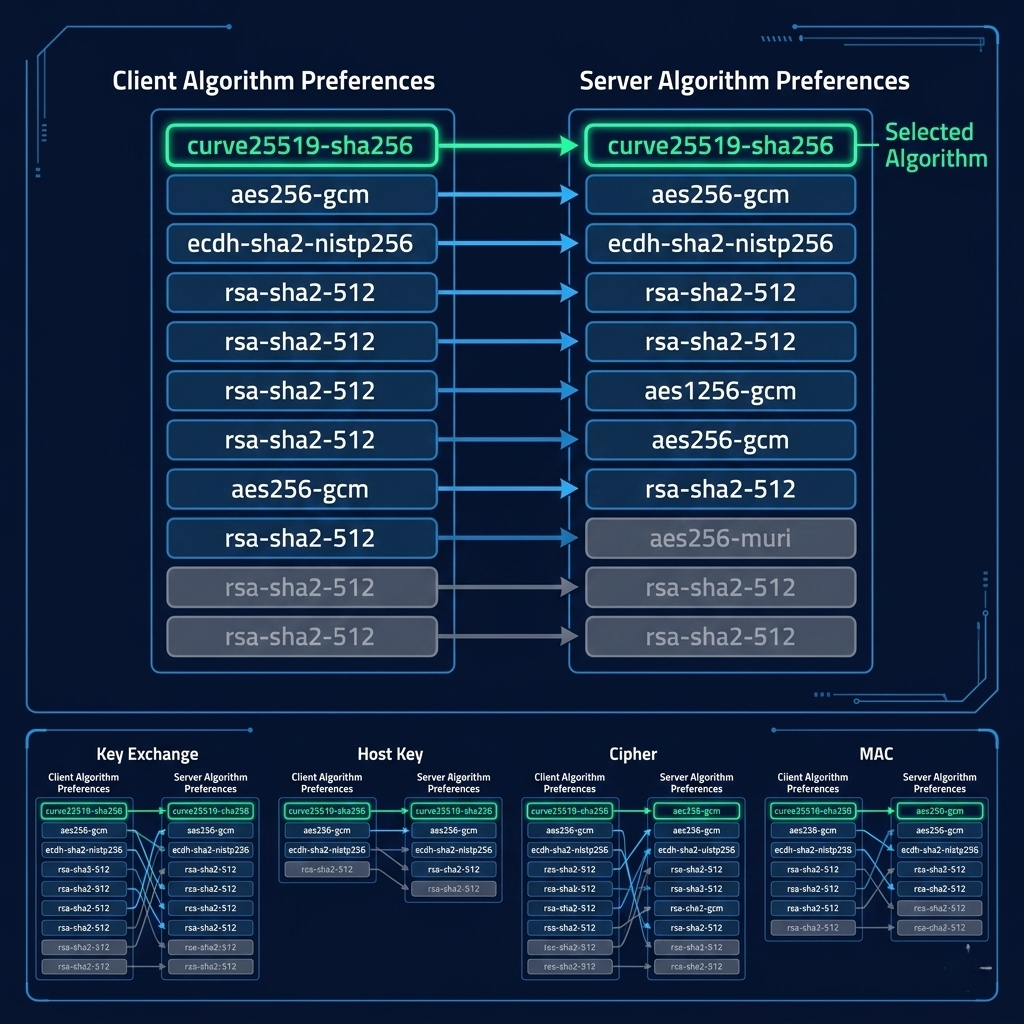
Pro Tips & Common Mistakes — Algorithm Negotiation
Pro Tip: Use
ssh-audit(available at ssh-audit.com or viapip install ssh-audit) to scan your SSH server configuration and get a detailed report on which algorithms are deprecated, vulnerable, or recommended. It's the quickest way to identify weak algorithms you may have missed, and it gives you specific remediation advice rather than just a pass/fail score.
Common Mistake: Blindly copy-pasting "hardened sshd_config" snippets from the internet without checking compatibility with your SSH version and your clients. Disabling a cipher that your deployment pipeline relies on will break your CI/CD exactly when you need it most. Always test configuration changes on a non-critical server first, and make sure you have an out-of-band access method (console, cloud provider's web shell) before applying SSH hardening changes remotely.
Stage 3 — Key Exchange and Perfect Forward Secrecy
This is the cryptographic heart of SSH — the stage that answers the question: how do two parties establish a shared secret key over an untrusted network without ever transmitting that key? The answer is one of the most elegant constructs in modern cryptography: the Diffie-Hellman key exchange (or its elliptic curve variant, ECDH).
Picture this: imagine you and a friend want to agree on a secret color, but you have to communicate through a transparent glass tube where anyone can watch. You both start with a publicly agreed-upon base color — say, yellow. You each secretly mix in a private color of your choosing. You exchange your mixed colors. Then you each add your own private color to the color you received. Both of you end up with the same final mixed color — a combination of yellow, your private color, and your friend's private color — but an observer who watched the entire exchange only saw yellow, your mixed color, and your friend's mixed color. They cannot reverse-engineer the final shared color because color mixing doesn't work backwards in a useful mathematical sense.
SSH uses Elliptic Curve Diffie-Hellman (ECDH), most commonly with Curve25519, which is the mathematical equivalent of this process. The "color mixing" is replaced with elliptic curve scalar multiplication — a mathematical operation that's trivially fast to compute forward but computationally infeasible to reverse. Both parties generate ephemeral (one-time) key pairs, exchange public keys, and each independently compute the same shared session key from the other's public key and their own private key. Neither party ever transmits the session key itself.
The word "ephemeral" in "ephemeral key exchange" is what gives SSH its perfect forward secrecy (PFS) — and this property is more important than most engineers realize. Because both parties generate fresh key pairs for every new session (rather than reusing long-term keys for encryption), an attacker who records all your encrypted SSH traffic today and then compromises your server's long-term private key tomorrow gains absolutely nothing. The session keys no longer exist. They were derived from ephemeral keys that were discarded when the session ended. Perfect forward secrecy means past sessions stay secure even if future key compromises occur.
# Generate an Ed25519 key pair (uses Curve25519, the modern standard)
# These are YOUR authentication keys (used in Stage 4, not Stage 3)
# Stage 3's ephemeral keys are generated automatically by the SSH client
ssh-keygen -t ed25519 -C "your_email@example.com" -f ~/.ssh/id_ed25519

# For RSA keys (legacy systems that don't support Ed25519):
ssh-keygen -t rsa -b 4096 -C "your_email@example.com" -f ~/.ssh/id_rsa
# Note: 4096-bit minimum; 2048-bit RSA is considered weak by modern standards

# View your public key (safe to share):
cat ~/.ssh/id_ed25519.pub

# Check what key exchange happened in an SSH connection:
ssh -vvv user@server 2>&1 | grep -i "kex\|curve\|diffie"
# Look for: "kex: algorithm: curve25519-sha256"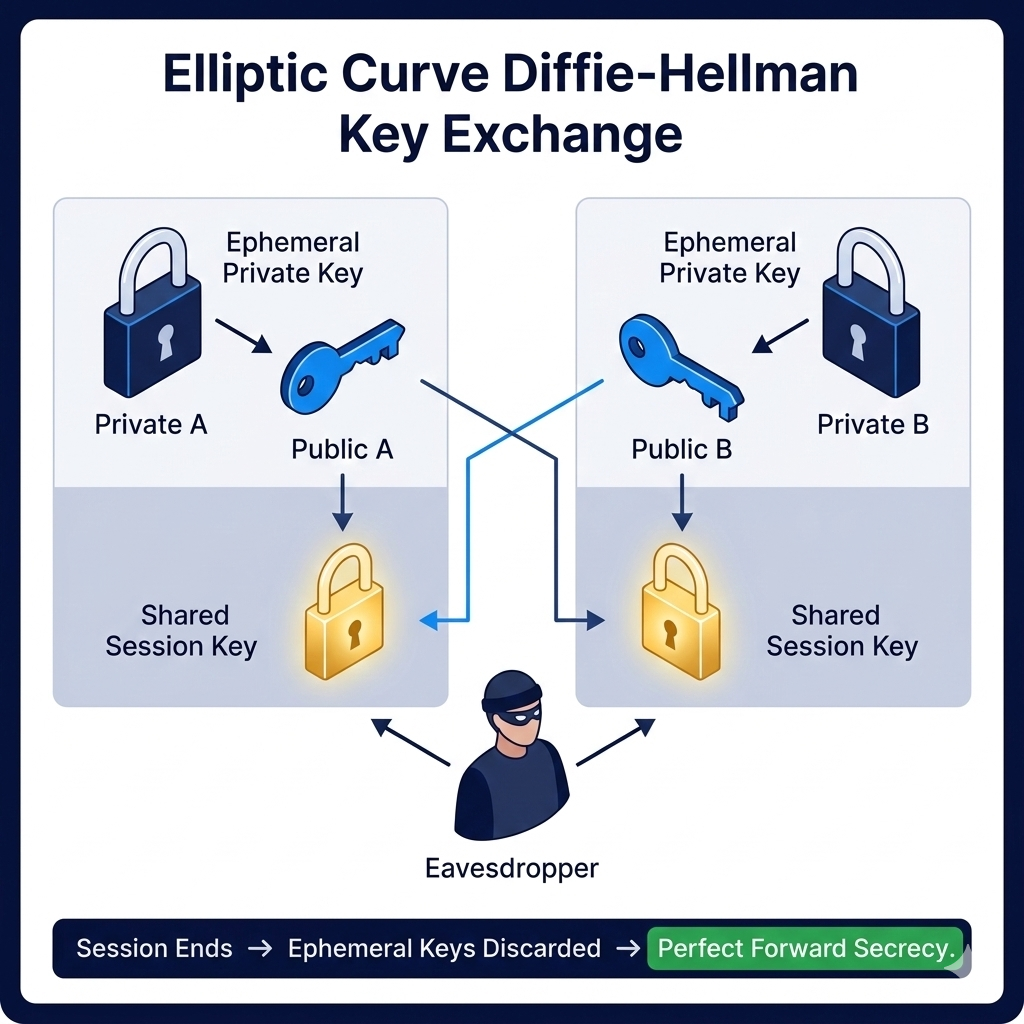
Pro Tips & Common Mistakes — Key Exchange and PFS
Pro Tip: Always use
curve25519-sha256as your preferred key exchange algorithm when possible. Ed25519/Curve25519 was designed by cryptographer Daniel Bernstein with side-channel resistance as a primary goal — making it resistant to timing attacks that have affected some NIST curve implementations. It's also faster than RSA-based key exchange and produces smaller keys. If your SSH version supports it, it should be first in yourKexAlgorithmslist.
Common Mistake: Confusing the key exchange (Stage 3, ephemeral, generates the session encryption key) with authentication keys (Stage 4, your
id_ed25519key pair). These are entirely separate cryptographic operations serving completely different purposes. Your~/.ssh/id_ed25519private key never touches the wire and plays no role in generating the session key — it only comes into play during authentication. Many developers mix these up when trying to understand SSH security properties.
Stage 4 — Authentication: Public Key vs Password
Key exchange established a shared encrypted channel. Now the server needs to verify: who is on the other end of this encrypted tunnel? This is authentication — and how you do it makes the difference between a reasonably secure server and one that's genuinely hardened against real-world attacks.
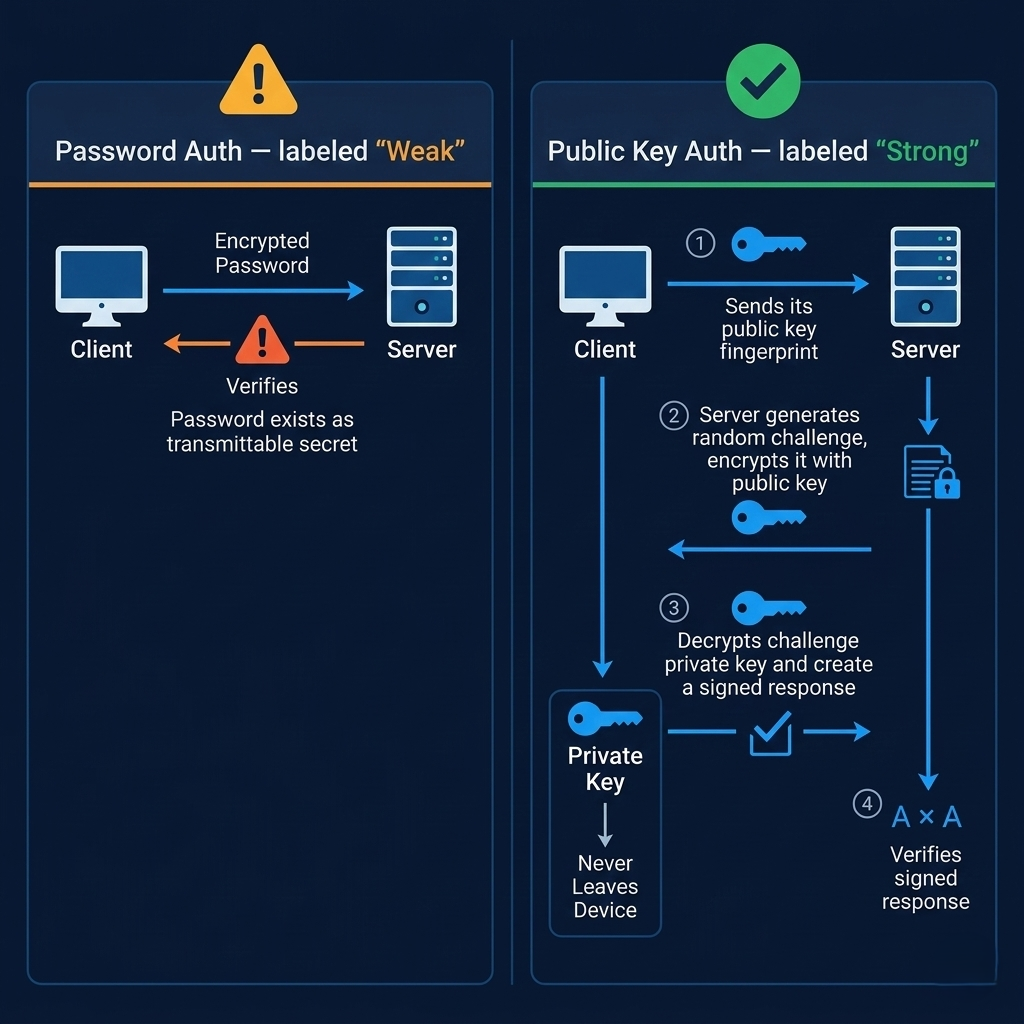
SSH supports multiple authentication methods, negotiated in order: public key, keyboard-interactive (usually password), GSSAPI (Kerberos), and others. Most tutorials treat public key and password authentication as equivalent alternatives, but they're not remotely equivalent from a security perspective. Password authentication is vulnerable to brute force, credential stuffing, phishing, and replay attacks (if an attacker somehow captures the authentication exchange). Public key authentication is immune to all of these, and understanding why explains why it's the standard for any server that matters.
Public key authentication works through a challenge-response protocol that proves you possess a private key without ever transmitting the private key. Here's the sequence: your client sends your public key to the server and says "I'd like to authenticate with this key." The server checks if that public key is in the user's ~/.ssh/authorized_keys file. If it is, the server generates a random challenge, encrypts it with your public key, and sends the encrypted challenge to your client. Your client decrypts the challenge using your private key (which only you have), combines the decrypted challenge with the session ID, and sends back a hash of the result. The server verifies this response. If it's correct, you're authenticated — without your private key ever leaving your machine.
This is the critical insight: your private key is a local secret that proves your identity through a mathematical puzzle, not a password you transmit. Even if someone records every byte of your SSH authentication exchange, they cannot extract your private key from it. The security model is fundamentally different from passwords — it's not "can you repeat the secret" but "can you solve the puzzle that only someone with this specific key can solve."
# Step 1: Generate your key pair (if you haven't already)
ssh-keygen -t ed25519 -C "your_email@example.com"
# Creates: ~/.ssh/id_ed25519 (PRIVATE — never share)
#          ~/.ssh/id_ed25519.pub (PUBLIC — safe to share)

# Step 2: Copy your public key to the server (the easy way)
ssh-copy-id -i ~/.ssh/id_ed25519.pub user@server
# This appends your public key to ~/.ssh/authorized_keys on the server

# Step 3: Manual alternative (if ssh-copy-id unavailable)
cat ~/.ssh/id_ed25519.pub | ssh user@server "mkdir -p ~/.ssh && chmod 700 ~/.ssh && cat >> ~/.ssh/authorized_keys && chmod 600 ~/.ssh/authorized_keys"

# Step 4: Test key-based login
ssh -i ~/.ssh/id_ed25519 user@server

# Step 5: Once confirmed working, DISABLE password authentication on server
# Edit /etc/ssh/sshd_config:
PasswordAuthentication no
PubkeyAuthentication yes
PermitRootLogin prohibit-password  # or 'no' for maximum security
ChallengeResponseAuthentication no
UsePAM no  # if you've disabled all PAM-based auth methods

# Reload SSH daemon
sudo systemctl reload sshd
Here's the counterintuitive insight that catches even experienced engineers: a passphrase-protected private key is more secure than a passphrase-free key, but the passphrase doesn't protect the key in transit — it protects the key at rest on your disk. If your laptop is stolen and your ~/.ssh/id_ed25519 file has no passphrase, the attacker has immediate access to every server that trusts that key. With a passphrase, they need to brute-force the passphrase to decrypt the key file. Use ssh-agent to avoid typing your passphrase on every connection while still keeping the key encrypted on disk.
Pro Tips & Common Mistakes — Authentication
Pro Tip: Use
ssh-agentwith your passphrase-protected keys so you only enter the passphrase once per session, not once per connection. On macOS, the system keychain integrates withssh-agentautomatically. On Linux, addeval "$(ssh-agent -s)"andssh-add ~/.ssh/id_ed25519to your shell profile. For team environments, consider tools like1Password SSH AgentorHashiCorp Vault SSHfor centralized key management.
Common Mistake: Adding too many public keys to
authorized_keysand never auditing them. Every key in that file is a door into your server. Keys for former employees, old laptops, deprecated CI/CD systems, and forgotten developer machines accumulate over time. Audit~/.ssh/authorized_keyson your servers regularly, remove unrecognized or stale keys, and consider using certificate-based SSH authentication (SSH CAs) for team environments where individual key management becomes unmanageable.
Stage 5 — The Encrypted Session
Authentication is complete. The shared session key from Stage 3 is in place. Now everything — literally every byte — that travels between your client and server is encrypted using that session key and the cipher negotiated in Stage 2. If you're using chacha20-poly1305@openssh.com (currently the preferred choice), your session data is encrypted and authenticated in a single pass using a stream cipher designed specifically to resist timing attacks.
The encrypted session isn't just encryption — it's an authenticated encryption scheme. This means every message includes a cryptographic MAC (Message Authentication Code) that verifies both integrity (the message wasn't modified in transit) and authenticity (the message genuinely came from the authenticated party). If an attacker inserts, modifies, or reorders packets in your SSH session, the MAC verification fails and the session terminates. You can't silently corrupt an SSH session — tampering is detectable.
Inside this encrypted tunnel, SSH2 supports channel multiplexing — the ability to run multiple logical channels over a single physical SSH connection. Your interactive shell, file transfers, port forwards, and X11 displays can all coexist as separate channels within one encrypted connection. This is why scp and sftp feel instantaneous when you're already connected to a server — they reuse the existing authenticated session rather than performing a full new handshake.
# Connection multiplexing — reuse an existing SSH connection
# Add to ~/.ssh/config:
Host your-server
    HostName your-server.com
    User ubuntu
    ControlMaster auto
    ControlPath ~/.ssh/cm-%r@%h:%p
    ControlPersist 10m

# First connection establishes the master
ssh your-server

# Subsequent connections reuse it (nearly instant, no new handshake)
ssh your-server "ls -la"  # reuses existing connection
scp file.txt your-server:~/  # reuses existing connection

# Check the encryption in use during an active session:
ssh -vvv user@server 2>&1 | grep "cipher\|MAC"
# Look for: "outgoing cipher: chacha20-poly1305@openssh.com"

# Transfer files securely using the same SSH infrastructure
scp local-file.txt user@server:/remote/path/
rsync -avz -e ssh ./local-dir/ user@server:/remote/dir/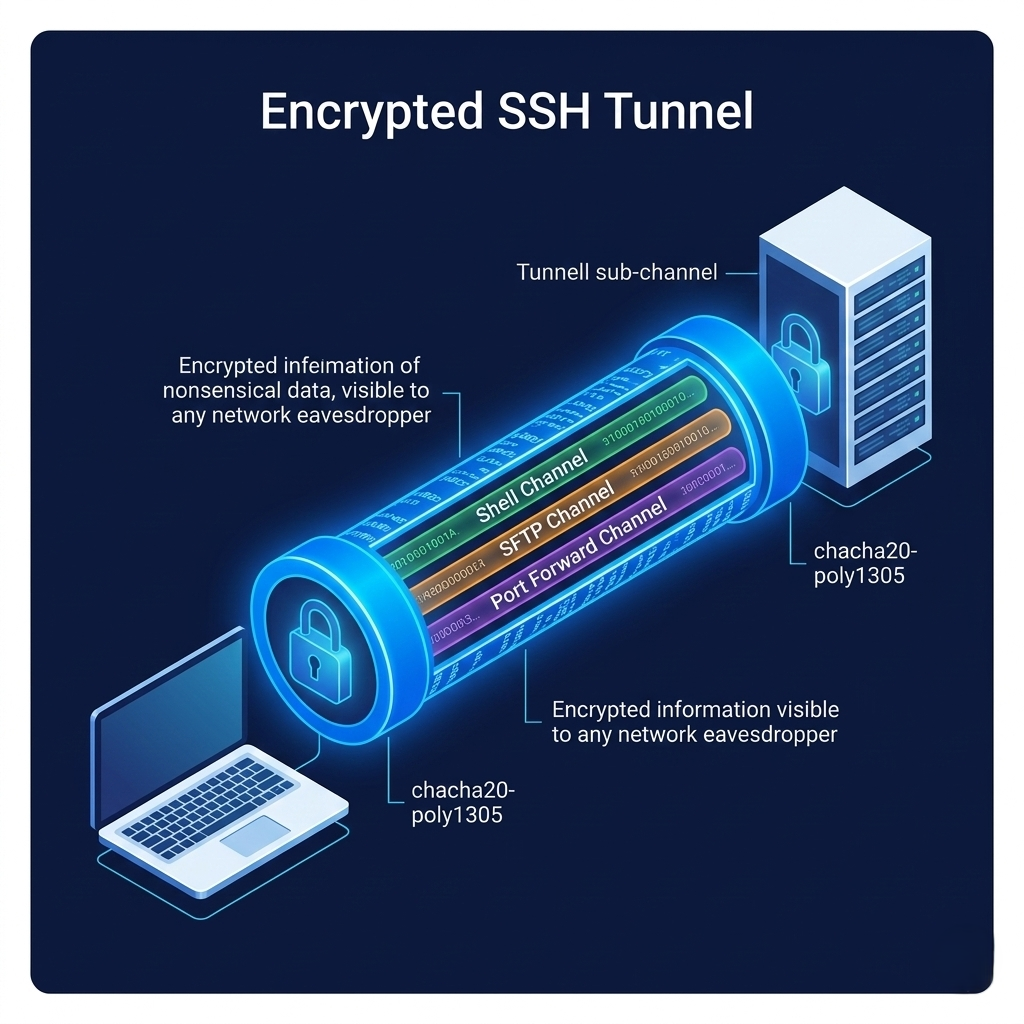
Pro Tips & Common Mistakes — Encrypted Session
Pro Tip: Configure
ServerAliveIntervalandServerAliveCountMaxin your~/.ssh/configto prevent SSH sessions from dying on idle connections behind NAT routers or firewalls that close inactive TCP sessions.ServerAliveInterval 60andServerAliveCountMax 3means SSH will send a keepalive packet every 60 seconds and give up after 3 missed responses — keeping long-running sessions alive without burning resources.
Common Mistake: Using
scpfor large file transfers to a server you're actively working on via SSH without connection multiplexing. WithoutControlMaster, everyscpcommand performs a full new SSH handshake — algorithm negotiation, key exchange, authentication — adding hundreds of milliseconds of overhead. With multiplexing enabled, subsequent connections are nearly instant because they reuse the established session.
SSH Port Forwarding: Tunneling Other Services
Once you have an encrypted SSH tunnel to a server, you can use that tunnel to route other network traffic through it — a capability called port forwarding or SSH tunneling. It's one of SSH's most powerful and underused features, and it turns your SSH connection into a general-purpose secure transport layer for any TCP-based service.
Local port forwarding maps a port on your local machine to a port on a remote machine (or a machine accessible from the remote machine). The most common use case: accessing a database, web service, or admin interface that's running on a remote server but not exposed to the internet. Instead of opening a firewall hole, you tunnel the traffic through SSH.
Remote port forwarding (also called reverse tunneling) maps a port on the remote server to a port on your local machine. This is how developers behind corporate firewalls or NAT share a local service with someone who can reach the SSH server — the server becomes a relay. A webhook from a payment provider can hit your remote server's port, which tunnels back through the SSH connection to your local development environment.
Dynamic port forwarding creates a SOCKS5 proxy through the SSH connection, letting you route arbitrary TCP traffic (not just a single port) through the tunnel. Configure your browser to use this SOCKS proxy and your entire browsing session is encrypted and appears to originate from the remote server.
# LOCAL PORT FORWARDING
# Forward local port 5432 to remote server's PostgreSQL (port 5432)
# Access remote DB at localhost:5432 while this tunnel is active
ssh -L 5432:localhost:5432 user@remote-server
# Or forward to a database on a DIFFERENT host accessible from the remote server:
ssh -L 5432:internal-db-server:5432 user@remote-server

# Run in background (no shell):
ssh -N -L 5432:localhost:5432 user@remote-server &

# REMOTE PORT FORWARDING (reverse tunnel)
# Expose your local port 3000 on the remote server's port 8080
# Anyone hitting remote-server:8080 gets forwarded to your local:3000
ssh -R 8080:localhost:3000 user@remote-server

# DYNAMIC FORWARDING (SOCKS5 proxy)
# Route all traffic through the SSH server
ssh -D 1080 user@remote-server
# Then configure your browser to use SOCKS5 proxy at localhost:1080

# In ~/.ssh/config for persistent local forwarding:
Host db-tunnel
    HostName remote-server.com
    User ubuntu
    LocalForward 5432 internal-db:5432
    LocalForward 6379 internal-redis:6379
    ServerAliveInterval 60
    ExitOnForwardFailure yes

# Connect the tunnel:
ssh -N db-tunnel &
Pro Tips & Common Mistakes — Port Forwarding
Pro Tip: Use
~/.ssh/configfor persistent, named tunnels instead of typing longssh -Lcommands. You can define multiple forwarding rules for a single host entry, addServerAliveIntervalto keep the tunnel alive, and useExitOnForwardFailure yesto kill the SSH process if the forwarding can't be established (preventing silent tunnel failures). Store your configs in version control (without keys) for team sharing.
Common Mistake: Leaving background SSH tunnels running indefinitely without monitoring them.
ssh -N -f -L ...tunnels run silently in the background, and if the underlying SSH connection dies (network hiccup, server restart), the tunnel is gone — but nothing tells you. Your application trying to uselocalhost:5432starts failing with connection refused. Use tools likeautossh(which automatically restarts died SSH tunnels) for production use cases, or check tunnel status withps aux | grep ssh.
How It All Connects: The Full SSH Handshake in Sequence
Let's step back and see the complete picture — because the individual stages are clear, but the sequence is what makes SSH genuinely impressive as an engineering achievement.
In the approximately 300 milliseconds from when you press Enter on ssh user@server to when your prompt appears, here's what happens: TCP establishes the connection, both parties identify themselves with version strings, they exchange ordered lists of supported algorithms and agree on the best mutual set, they perform an ephemeral Elliptic Curve Diffie-Hellman key exchange (generating a shared session key that neither party ever transmits), the server proves its identity using its long-term host key (so you know you're not talking to an imposter), your client authenticates using your private key's challenge-response (proving you're you without sending your key), and the encrypted channel opens. Every subsequent byte goes through the symmetric cipher with the session key.
Each stage builds on the last in a way that's neither accidental nor merely sequential — it's a security architecture. Stage 3's ephemeral key exchange means Stage 5's session key has perfect forward secrecy. Stage 4's public key authentication works inside Stage 3's encrypted channel, which means your authentication traffic is itself encrypted (unlike some protocols where auth precedes encryption). Stage 2's algorithm negotiation means Stage 3 and Stage 5 use algorithms both parties are current-version capable of using, not the lowest common denominator.
The key insight for practitioners: when something goes wrong with SSH — connection refused, authentication failed, cipher negotiation error — it almost always fails at one specific stage, and the verbose output from ssh -vvv tells you exactly which stage. Learn to read the verbose output, and debugging SSH goes from frustrating guesswork to a systematic five-minute diagnosis.
Getting Started: SSH Setup, Hardening, and Daily Use
Here's a complete, opinionated setup guide covering key generation, server hardening, and the config patterns that make SSH a pleasure to use in production.
Step 1: Generate a modern key pair
# Generate Ed25519 key (preferred) with a strong passphrase
ssh-keygen -t ed25519 -C "your-email@domain.com" -f ~/.ssh/id_ed25519
# When prompted, enter a strong passphrase — don't skip this

# If you need RSA for legacy compatibility, use 4096 bits minimum
ssh-keygen -t rsa -b 4096 -C "your-email@domain.com" -f ~/.ssh/id_rsa_legacy
Step 2: Set up ssh-agent for passphrase caching
# Add to your ~/.bashrc or ~/.zshrc
eval "$(ssh-agent -s)"
ssh-add ~/.ssh/id_ed25519
# On macOS, use Keychain integration:
ssh-add --apple-use-keychain ~/.ssh/id_ed25519
Step 3: Create a production-ready ~/.ssh/config
# ~/.ssh/config — global defaults + per-host overrides
Host *
    ServerAliveInterval 60
    ServerAliveCountMax 3
    AddKeysToAgent yes
    IdentityFile ~/.ssh/id_ed25519

Host prod-web
    HostName 203.0.113.42
    User ubuntu
    Port 2222
    IdentityFile ~/.ssh/id_ed25519
    ControlMaster auto
    ControlPath ~/.ssh/cm-%r@%h:%p
    ControlPersist 10m

Host prod-db-tunnel
    HostName 203.0.113.42
    User ubuntu
    Port 2222
    LocalForward 5432 internal-postgres:5432
    LocalForward 6379 internal-redis:6379
    ServerAliveInterval 30
    ExitOnForwardFailure yes
Step 4: Harden the server's sshd_config
# /etc/ssh/sshd_config — production hardening checklist
Protocol 2                          # SSH2 only — never SSH1
Port 2222                           # non-standard port (optional but reduces noise)
PermitRootLogin no                  # never allow direct root login
PasswordAuthentication no           # public key only
PubkeyAuthentication yes
AuthorizedKeysFile .ssh/authorized_keys
MaxAuthTries 3                      # limit brute force attempts
MaxSessions 10                      # limit multiplexed sessions
ClientAliveInterval 300             # disconnect idle clients after 5 minutes
ClientAliveCountMax 2
LoginGraceTime 30                   # give client 30s to authenticate
AllowUsers deploy ubuntu            # whitelist specific users
X11Forwarding no                    # disable unless needed
AllowTcpForwarding yes              # enable if you need port forwarding
GatewayPorts no                     # prevent remote forwards binding to all interfaces
PrintLastLog yes
Banner /etc/ssh/banner              # legal warning banner if required

# Modern cipher hardening:
KexAlgorithms curve25519-sha256,curve25519-sha256@libssh.org
HostKeyAlgorithms ssh-ed25519,rsa-sha2-512,rsa-sha2-256
Ciphers chacha20-poly1305@openssh.com,aes256-gcm@openssh.com,aes128-gcm@openssh.com
MACs hmac-sha2-512-etm@openssh.com,hmac-sha2-256-etm@openssh.com
Step 5: Verify your configuration before applying
# Test sshd_config syntax without restarting
sudo sshd -t

# Reload without dropping existing sessions
sudo systemctl reload sshd

# Verify your hardening with ssh-audit
pip install ssh-audit
ssh-audit your-server.com
Step 6: Set up fail2ban to block repeated failures
# Install fail2ban
sudo apt install fail2ban

# /etc/fail2ban/jail.local
[sshd]
enabled = true
port = 2222          # match your SSH port
maxretry = 3
bantime = 3600       # ban for 1 hour
findtime = 600       # within 10 minutes

sudo systemctl enable fail2ban
sudo systemctl start fail2ban
FAQ
Q: What is the difference between SSH1 and SSH2?
SSH1 and SSH2 are fundamentally different protocols that share a name. SSH1 uses a single DES or 3DES cipher for everything, lacks proper integrity checking, and has known cryptographic vulnerabilities — including a session hijacking attack. SSH2 uses separate key exchange, host authentication, and session encryption phases with independently negotiated algorithms, provides proper MAC-based integrity verification, supports channel multiplexing, and has no known cryptographic breaks. SSH1 should be treated as completely obsolete and disabled on all modern servers.
Q: Is it safe to use the same SSH key for multiple servers?
Using one key across multiple servers is convenient but creates a risk blast radius: if your private key is compromised, every server it's authorized on is compromised. For personal use, one well-protected Ed25519 key with a strong passphrase is a reasonable tradeoff. For production environments, use per-service keys or, better, SSH certificate authorities (SSH CAs) where keys are issued, audited, and expire automatically. Never share a private key between team members — each person should have their own key pair.
Q: Why does SSH ask me to verify a host fingerprint the first time?
The first connection to a new server presents you with the server's host key fingerprint — a hash of the server's public key — and asks you to verify it. This protects against man-in-the-middle attacks: if you don't verify the fingerprint and just hit "yes" every time, an attacker between you and the server could substitute their own key and silently intercept your session. The right practice is to verify the fingerprint out-of-band (cloud console, known-good prior connection, or a fingerprint published on an authenticated page) before accepting it. The fingerprint is stored in ~/.ssh/known_hosts after acceptance.
Q: What does "WARNING: REMOTE HOST IDENTIFICATION HAS CHANGED" mean?
It means the host key presented by the server at the IP you're connecting to is different from the one stored in ~/.ssh/known_hosts from a previous connection. Legitimate causes include: the server was rebuilt, the OS was reinstalled, or you're connecting to a different server at the same IP. Malicious causes include: a man-in-the-middle attack intercepting your connection. Before dismissing this warning, verify the new fingerprint through an out-of-band channel. If legitimate, remove the old entry with ssh-keygen -R hostname and reconnect.
Q: Can I use SSH without a password or a key file?
Yes, through SSH certificates (not to be confused with TLS certificates). SSH certificate authorities let you sign users' public keys with a CA key, and servers trust any certificate signed by a known CA. Users present their certificate (a signed public key) instead of requiring their public key to be pre-loaded on the server. This is how large organizations manage SSH access at scale — no authorized_keys files to maintain, certificates can expire automatically, and revocation is straightforward. HashiCorp Vault, AWS IoT, and Cloudflare's Teleport all implement SSH CA workflows.
Q: What's the security difference between using a passphrase vs not?
Without a passphrase, your private key file is stored in plaintext on disk. Anyone with access to your filesystem (malware, physical theft, backup disclosure) can immediately use your key to authenticate as you everywhere it's trusted. With a passphrase, the key file is encrypted on disk using your passphrase — an attacker needs both the file and the passphrase. The passphrase does not protect your key in transit (which is already protected by Stage 3's encryption), only at rest. Always use a passphrase for keys that authenticate to production systems.
Q: How does SSH tunneling differ from a VPN?
Both create encrypted tunnels for network traffic, but they work at different layers and serve different use cases. A VPN operates at the network layer, routing all your traffic through the VPN server and typically assigning you a network address in the VPN's subnet — you appear to be on the VPN's network. SSH tunneling operates at the application layer, forwarding specific TCP ports through an existing SSH connection. SSH tunnels are simpler to set up (no VPN client, no certificate infrastructure), more granular (forward only the ports you need), and work anywhere SSH works — but they don't provide the full network-level access that a VPN does.
Q: Why should I care about perfect forward secrecy for SSH?
Perfect forward secrecy (PFS) means that if your server's long-term private key is ever compromised — through a breach, a legal subpoena, or key theft — an attacker cannot use it to decrypt any previous SSH sessions they may have recorded. Without PFS, an attacker recording today's encrypted SSH traffic could potentially decrypt it in the future if they later obtain your server's private key. With PFS (provided by ephemeral key exchange in Stage 3), each session's encryption key is derived from throwaway keys that no longer exist after the session ends. There's nothing for the attacker to decrypt with.
Conclusion
SSH is 30 years old and still the backbone of how engineers connect to, manage, and secure remote systems. Not because it won by default or because nothing better came along — but because the protocol design is genuinely elegant. The staged handshake, the ephemeral key exchange, the public key authentication model, the multiplexed channel architecture — each piece is the product of careful thinking about what security actually requires, not just what's convenient.
Understanding how SSH works — really understanding it, not just knowing the commands — changes how you use it. You become the engineer who reads the verbose output instead of rebooting the server. Who disables password authentication as a first step, not an afterthought. Who sets up connection multiplexing and config files and ssh-agent before the friction of SSH becomes an excuse to skip it. Who doesn't just type yes at the host fingerprint prompt.
The engineers who built the internet's infrastructure made it secure by understanding what they were building. That's still the standard worth aspiring to.